How to Unlock Read Only Document in Word Perfect
WordPerfect shortens the road to file conversion
Suppose you need to convert a batch of Microsoft® Word files to WordPerfect®. How do you become about doing it? Practice you open the files in WordPerfect one at a time? Opening files individually works fine if you are converting simply one or ii files. It's very fourth dimension consuming, however, if you need to convert multiple files. Do you create a macro? You could, only, again, you probably have better things to exercise.
The options listed in a higher place draw the long route to file conversion, just you will exist happy to know that in that location is a shortcut.
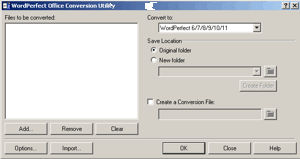
WordPerfect has another option for converting multiple files simultaneously: the WordPerfect® Office Conversion Utility. It can convert various types of files, such equally Microsoft® Give-and-take files, to i of five WordPerfect file formats.
You lot tin can besides open multiple files using a Comma-separated values (csv) file. The csv file needs to contain a list of the files, including their directory structure. This allows you to organize the files before converting them. For example, the csv selection is useful if you need to catechumen some, but not all files, or if y'all want to select some but not all subfolders. Without using a csv file, you lot would accept to manually add the files constitute in the unlike folders.
If you chose the standard installation of WordPerfect Office, the WordPerfect Office Conversion Utility should be bachelor by default. If it'south not bachelor, you lot can add it past modifying the installation. Call up the WordPerfect® Office Conversion Utility the next time you lot need to catechumen a batch of files. Why take the long road when there is a shortcut.
To install the WordPerfect® Role Conversion Utility
- Close whatsoever open applications.
- On the Windows taskbar, click Kickoff } Settings } Control panel.
- Double-click the Add/Remove programs icon.
- Choose WordPerfect Function 11 from the Currently installed programs list.
- Click Change.
- In the InstallShield wizard, enable the Modify option, and click Next.
- In the list of features, open the WordPerfect Part eleven } Utilities category.
- Click the icon next to the WordPerfect Conversion Utility detail, and click This feature will be installed on local difficult drive.
- Click Next.
- Click Install.
To starting time the conversion utility
- On the Windows taskbar, click Start } Programs } WordPerfect Office 11 } Utilities } Conversion utility.
To convert a multiple files to the WordPerfect® format
- Click Add.
- Choose the drive and binder where the files you want to convert are stored.
- Click Add all.
If you want to convert the files in the folders within the folder, enable the Include subfolders check box. - From the Catechumen to listing box, cull a version of WordPerfect.
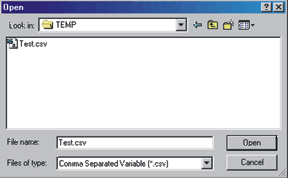
To catechumen an imported comma separated value (CSV) file into WordPerfect®
- Click Import.
- Click Add together.
- Cull the drive and folder where the CSV file is stored.
- Click a file.
- Click Open up.
- Click OK.
- From the Convert to list box, choose a version of WordPerfect.
Publishing WordPerfect® documents to PDF
Do you lot demand to share your WordPerfect® documents with people who don't take WordPerfect? If you do, you have the option of publishing documents to Portable Document Format (PDF). PDF format is useful when you desire to distribute documents that are meant only for viewing and printing.
When publishing to PDF, you lot tin can choose one of iii preset styles. The manner settings are designed to optimize the PDF document for a specific method of distribution. The style you choose should stand for with how you plan to distribute the file.
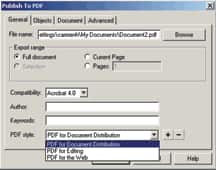
Y'all can cull from three PDF styles.
For example, for almost documents, y'all tin can choose the document distribution manner because the settings are suitable for the average certificate. You can specify the Spider web style if y'all program to mail the file on a Web folio; this optimizes the PDF file for viewing on the Web and information technology also reduces the file size. The editing fashion publishes the PDF file with all fonts and images at total resolution; this can be useful if yous plan to edit the file using Adobe® Acrobat®.
The person receiving the PDF file can view or print it if they have Adobe® Reader® installed on their calculator. If you lot want to view the PDF files yous create before sending them to others, you lot likewise need to accept Adobe Reader installed on your computer. If you don't have information technology, you tin can install it from WordPerfect Office 11 CD two.
To publish the agile document to PDF
1. Click File, Publish to PDF.
2. Click the Full general tab.
three. In the Export range area, enable one of the following options:
- Total document — publishes the entire file
- Electric current page — publishes the active page just
- Pages — publishes a portion of the file
- Choice — publishes selected text
4. From the PDF style list box, choose one of the post-obit options:
- PDF for document distribution
- PDF for the Web
- PDF for editing
5. In the Filename list box, click Scan.
vi. Choose the drive and folder where you want to salvage the file.
7. Type the filename in the Filename box.
eight. Click Save.
To install Adobe® Reader®
one. Insert WordPerfect Office 11 CD 2 into the CD bulldoze. If the Setup wizard does not start automatically, proceed to step ii; otherwise, go on to footstep 6.
ii. Click Start on the Windows® taskbar, and click Run.
3. Type D:SETUP, where D is the letter of the alphabet that corresponds to the CD bulldoze.
4. Double-click ExploreCD.exe.
5. Double-click intro.exe.
6. In the WordPerfect Function 11 CD ii dialog box, click Adobe Acrobat Reader.
7. Follow the instructions in the Adobe Reader setup program.
Using the Conversion Utility
The procedure of converting documents from other file formats has improved with each new release of WordPerfect. In version xi, in that location is a brand new conversion utility that volition batch convert documents in other formats, so y'all don't have to do them 1 at a fourth dimension. The list of formats is as well long to include here, but suffice it to say that every known version of Microsoft Give-and-take is there as well every bit RTF, HTML, DIF, StarOffice, ANSI/ASCII, and WP for Mac. You tin even convert CSV (comma separated value) files.
To commencement the conversion utility, click Outset, (All) Programs, WordPerfect Office 11, Utilities, Conversion Utility. The first step is to select the files that you want to convert, so click the Add push. Choose the drive and folder where the files are stored. Select the file, so click Add together, or, if you want to convert all of the files in this folder, click Add together all.
One time you've built the listing, select the version of WordPerfect that you want to catechumen the files to in the Catechumen to drop-downwardly listing. Find that y'all tin convert to DOS and Macintosh file formats. There are some options that you can set with regards to indistinguishable file names. Otherwise, cull OK to start the conversion.
If yous wish to view and change the file proper noun options, click the Options button. In the Conversion Options dialog box, you can opt to create a log file of the conversion process. I find this extremely helpful when I'm converting a large number of files and I want to verify that the process went smoothly.
Past default, the utility will save the converted files to the same binder. If you lot prefer, you tin can have the files saved in a unlike folder. Y'all can too save a copy of the converted file every bit a CSV file, which could be used every bit an alternate if the conversion procedure doesn't go as well as you had hoped. Enable the Create a conversion file option, specify a drive and binder where yous want to save the CSV file, then cull Relieve.
If you want more information on any of the conversion options, or if you want to view a consummate listing of file formats that can be converted with the utility, click the Help push to admission the help topics.
Using WordPerfect® Classic way
WordPerfect® Classic mode lets you piece of work in the familiar visual environment of Corel® WordPerfect® five.1 and utilise its keystrokes.
The WordPerfect Classic mode environment emulates that of Corel WordPerfect v.1 by modifying the WordPerfect environment. For example, in WordPerfect Classic mode some elements, such as the toolbars, holding bar, horizontal scrollbar, and ruler, are not displayed by default; the page display shows document text in a window with minimal white space in the margins; the certificate color is blue; and the displayed text is greyness, although it still prints black-on-white unless otherwise specified.
Before you can get-go working in the WordPerfect Classic style environment, you must install it and enable information technology. If you desire to perform functions using keystrokes that are based on Corel WordPerfect 5.1, you lot need to enable the Archetype mode keyboard.
To install WordPerfect® Archetype fashion
- Close any open applications.
- On the Windows® taskbar, click Start, Settings, Command panel.
- Double-click the Add/Remove programs icon.
- Choose WordPerfect Office 11 from the Currently installed programs list.
- Click Alter.
- In the InstallShield® wizard, enable the Modify option, and click Next.
- In the listing of features, open the WordPerfect Office eleven, WordPerfect category.
- Click the icon adjacent to the WordPerfect Archetype style particular, and click This feature will be installed on local hard drive.
- Click Next.
- Click Install.
To enable the Archetype mode surroundings
- In WordPerfect, click Tools, Settings, Display.
- Click the Certificate tab.
- Enable the Classic mode (WP 5.1) bank check box.
To enable the Classic mode keyboard
- In WordPerfect, click Tools, Settings, Customize.
- Click the Keyboards tab.
- Choose from the Bachelor keyboards list.
- Click Select.
Installing Additional Templates
Templates are great timesavers. Imagine a collection of professionally designed documents–ready to use–all yous accept to practise is make full in the blanks. That's what a template is. You tin relieve hours of formatting if yous take advantage of WordPerfect's templates.
A small collection of templates is installed when you install WordPerfect. You tin encounter the listing by choosing File, New From Project. Brand sure WordPerfect appears in the drop-down list. Boosted templates are available in a free download. Although the templates were written for WordPerfect 10, they will work just fine in WordPerfect 11.
The templates tin be downloaded from OfficeCommunity.com in the Download Gallery section. To download a template or project zip file from OfficeCommunity.com, click the [download] link. When you lot are prompted, save the file to the \wordperfect role xi emplate folder under the \program files tree.
Yous can also download them from Corel'southward FTP site at ftp://ftp.corel.com/pub/WordPerfect/wpwin/10/english/templates. To download a template, click the name of the template you are interested in. This opens that template's folder on the FTP server. Within each template's folder is a file named Template and Projection - Read Me.htm. This file contains detailed data about installing the templates in WordPerfect.
There are some other extras on the ftp site. Beginning, at that place is a Zip file chosen WP x Temp that contains all the template files then that you can download the whole drove at i time. 2nd, within each template category folder is a README file with instructions for installing. Third, there is a thumbnail folder in each category, containing a GIF file that shows yous what each created project form might look similar.
If you download a Cipher file, extract the template files (.wpt and .ast) to the \wordperfect part eleven emplate folder under the \program files tree. Now, you're ready to add together them into WordPerfect.
To install downloaded templates:
- Choose File, New from Project to open the PerfectExpert dialog box.
- Click the Options push button, and then select Refresh Projects from the list. Click Yes to confirm.
On my system, the downloaded templates were stored in a WordPerfect x category, then if you don't see the new templates in the list, open the drop-downwards list of categories and select WordPerfect 10.
When you open one of the WordPerfect 10 templates, yous may see a message stating that the PerfectExpert resource file couldn't be plant. It'south only a alarm and y'all can ignore information technology.
Creating a Sheet of Identical Labels
Y'all may already know how to use the Merge feature to create labels for a mass mailing, but did y'all know you lot can create a sheet of identical labels as well? You can print your own return address labels, concern cards, or any other kind of characterization that you lot use oft, with this method.
To create a sheet of identical labels:
- Choose Format, Labels and select the label form. Create the offset label.
- Choose Tools, Merge.
- Cull Grade Document, Create Form Document, Use File in Active Window.
- If the Acquaintance Form and Data dialog box appears, choose No Clan. Otherwise, cull Data Source, None in the Merge dialog box.
- Choose Options, then blazon the number of labels on the folio in the Number of Copies for Each Record text box.
- Choose Merge.
The resulting document volition contain a number of identical labels. If you flubbed the number of labels, don't worry. Just close this document, without saving, and try the merge again. When you are finished, save the label course for the next time you desire to print these labels.
Protecting a File from Adventitious Modification
Most of u.s.a. have "form" documents that we open up and apply to create a new document. Businesses ordinarily have a drove of form letters then the correspondence leaving the company has a consequent advent and tone. The play tricks is to recollect to immediately save the new certificate under a new proper noun, so the changes aren't accidentally saved to the "form" document. If yous forget, you tin easily salve your changes, and alter the original.
At that place is a better fashion. You can designate a file to be "read-only". When y'all open a read-only file, you won't exist allowed to relieve your changes to the original, and so you lot accept to save your changes to a new file. It is impossible to accidentally change a file that has been ready to read-but.
To designate a file as read-only, you must have saved the file to disk. You cannot accept a copy of the file open in a WordPerfect window.
- Choose File, Open.
- Navigate to the file that you want to designate as read-only.
- Right-click the file and choose Properties.
- Place a bank check mark in the Read-only check box in the Attributes section.
- Choose OK.
To brand changes to this original file, yous'll have to reverse the process and remove the Read-merely attribute. Be certain you lot set it dorsum subsequently y'all've finalized the new class certificate.
Source: https://www.wordperfect.com/en/pages/items/1500774.html
0 Response to "How to Unlock Read Only Document in Word Perfect"
Post a Comment